Products

S4013 Hoppe Millennium Adjustable Hinge - 2-D Set Hinge
Part Number: S4013 Hoppe Millennium Adjustable Hinge - 2-D Set Hinge with Non-removable Pin Vertical Adjustment - Hinges are Non Handed. Works for both Left hand and Right hand swinging doors. Known to been used on WeatherSheild and Peachtree Doors Colors Still Available: Stainless Steel Discontinued Colors: Oil Rubbed Bronze, Brass Chrome, antique brass Pat.Nr. 5.701.1636, 122210600 Set and Guide Hinge Placement Table: 3 Hinges Per Door Panel - Up to 165 lbs: Starting at top of door Top of door Guide - Part Number S4014 Set - See Part Number S4013 Guide - Part Number S4014 4 Hinges Per Door Panel -Up to 165 lbs: Anytime you need 4 hinges you would just add another guide hinge Starting at top of door Top of door Guide - Part Number S4014 Guide - Part Number S4014 Set - See Part Number S4013 Guide - Part Number S4014 4 Hinges Per Door Panel - 165 - 330 lbs: Starting at top of door Top of door Guide - Part Number S4014 Set - See Part Number S4013 Set - See Part Number S4013 Guide - Part Number S4014 5 Hinges Per Door Panel - 165 to 330 lbs: Guide - Part Number S4014 Guide - Part Number S4014 Set - See Part Number S4013 Set - See Part Number S4013 Guide - Part Number S4014 Pro Tip: Remove weight from the hinges by lifting up on the door before you adjust. Known part # 850-2388803, 850-8754819, 122210600 General HOPPE Adjustable Hinge Adjustment Instructions: Determine hinge locations on the frame and door panel. Recommended hinge positions are given in the Set and Guide Hinge Placement Table above. Prepare the door panel and frame. Fasten hinges into the door panel. #10 ANSI wood screws with a minimum length of 1 1/4” are recommended. The Set Hinge must be installed according to the installation label. The label on the frame leaf will point down to the sill when properly installed. On the frame, use #10 ANSI wood screws that are 5/8” to 3/4” long in three of the four screw locations. One screw on each hinge should be at least 1 1/2” long to reach the stud. This screw is typically left out and is installed after the door is positioned in the rough opening. Install the frame leaf of the Set Hinge into the routing on the frame and fasten securely. Do not allow the Set Hinge(s) to support the weight of the panel without installing the Guide Hinges. Install the frame leaf of the Guide Hinges into the routings on the frame and fasten securely. Leaves on the Guide Hinges will slide freely up and down for alignment with the rout. Do not adjust hinges prior to the final installation into the rough opening. This will affect the ability of the door installer and end user to utilize the full adjustment range of the HOPPE Adjustable Hinge. Disassembly Do not attempt to remove the hinge pin, as this may cause damage. To disassemble the door panel from the frame, support the weight of the panel to relieve the weight from the hinges. Carefully remove either the frame leaf screws or door leaf screws to displace the panel. Adjustment InstructionsIntroductionThere are two types of HOPPE Adjustable Hinges on each door panel: Set Hinge: One or two per panel. The Set Hinge provides ± 1/8” vertical adjustment. Guide Hinge: Two or three per panel. The Guide Hinges provide ± 1/8” horizontal adjustment. Look for the visible adjusting screw on the door sash leaf. This identifies the hinge as a Guide Hinge. Hinge designs may vary, but adjustment remains the same. Required Tools A 3/16” hex wrench is required. A small flat head screwdriver is required. A plastic putty knife is recommended. Vertical Adjustment for Doors with One Set HingeWith the door closed or open: Remove the press-fit Finial Cap from the bottom of the Set Hinge to expose the adjustment screw. Use the small screwdriver for Set Hinges featuring a plastic Finial Cap. A plastic putty knife is recommended for Set Hinges featuring a brass Finial Cap. Insert the hex wrench into the bottom of the Set Hinge. Tighten the screw to raise the panel and loosen to lower the panel. Reinstall the Finial Cap removed in Step 1. Vertical Adjustment for Doors with Two Set HingesWith the door closed or open: Remove the press-fit Finial Cap from the bottom of the Set Hingeto expose the adjustment screw. Use the small screwdriver forSet Hinges featuring a plastic Finial Cap. A plastic putty knife isrecommended for Set Hinges featuring a brass Finial Cap. To raise the panel, insert the hex wrench into the top-most SetHinge and tighten the adjustment screw to achieve the desiredInsert the hex wrench into the other Set Hinge andtighten the adjustment screw 1/8 turn past the onset of resistanceto distribute the panel weight evenly between both Set Hinges. To lower the panel, insert the hex wrench into the top-most SetHinge and loosen the adjustment screw as far as possible withoutInsert the hex wrench into the other Set Hinge andloosen the adjustment screw to achieve the desired adjustment.Retighten the adjustment screw on the top-most 1/8 turn past theonset of resistance to distribute the panel weight evenly betweenboth Set Hinges. Reinstall the Finial Caps removed in Step 1. Horizontal AdjustmentWith the door open: Insert a 3/16” hex wrench into the horizontal adjustment screw. Turn clockwise to decrease the margin and counterclockwise toincrease the margin on the hinge side. IF THIS HINGE DOES NOT LOOK EXACTLY LIKE YOUR ADJUSTABLE HINGE. CLICK HERE TO SEE ALL THE ADJUSTABLE HINGES WE HAVE ON OUR WEBSITE TO ORDER. IF YOU ARE NOT FINDING YOUR HINGE PLEASE EMAIL OR TEXT OUR RESEARCH DEPARTMENT AND WE WOULD BE HAPPY TO ASSIST YOU
$ 120.00
-
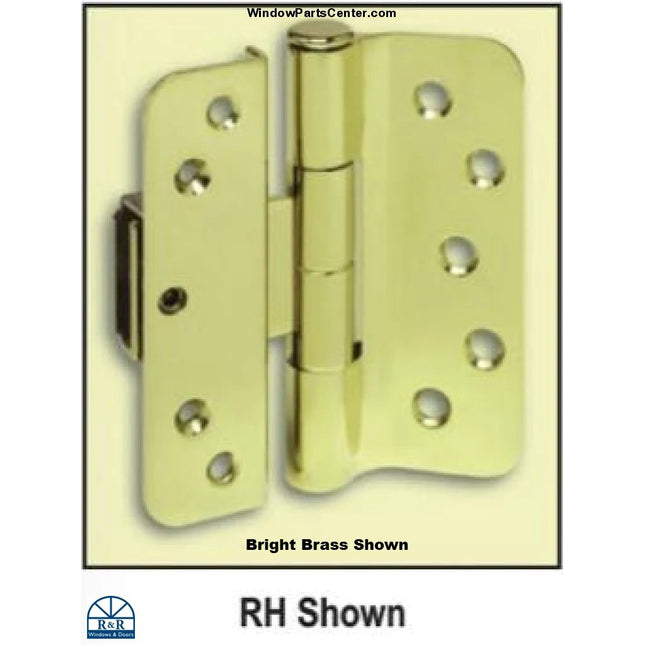
S4014 Hoppe Millennium Adjustable Hinge - 2-D Guide Hinge
Part Number: S4014 S4014 Hoppe Millennium Adjustable Hinge - 2-D Guide Hinge with Non-removable Pin Horizontal Adjustment - Hinges are Non Handed. Works for both Left hand and Right hand swinging doors. Known to been used on WeatherSheild and Peachtree Doors Colors Still Available: Stainless Steel Discontinued Colors: Oil Rubbed Bronze, Antique Brass, Brass, Brushed Chrome Pat.Nr. 5.701.636 122190600, 850-8754743 Set and Guide Hinge Placement: 3 Hinges Per Door Panel - Up to 165 lbs: Starting at top of door Top of door Guide - Part Number S4014 Set - See Part Number S4013 Guide - Part Number S4014 4 Hinges Per Door Panel -Up to 165 lbs: Anytime you need 4 hinges you would just add another guide hinge Starting at top of door Top of door Guide - Part Number S4014 Guide - Part Number S4014 Set - See Part Number S4013 Guide - Part Number S4014 4 Hinges Per Door Panel - 165 - 330 lbs: Starting at top of door Top of door Guide - Part Number S4014 Set - See Part Number S4013 Set - See Part Number S4013 Guide - Part Number S4014 5 Hinges Per Door Panel - 165 to 330 lbs: Guide - Part Number S4014 Guide - Part Number S4014 Set - See Part Number S4013 Set - See Part Number S4013 Guide - Part Number S4014 Pro Tip: Remove weight from the hinges by lifting up on the door before you adjust. Known part # 850-8754731, 850-8754743,122190600 General HOPPE Adjustable Hinge Adjustment Instructions: Determine hinge locations on the frame and door panel. Recommended hinge positions are given in the Set and Guide Hinge Placement Table above. Prepare the door panel and frame. Fasten hinges into the door panel. #10 ANSI wood screws with a minimum length of 1 1/4” are recommended. The Set Hinge must be installed according to the installation label. The label on the frame leaf will point down to the sill when properly installed. On the frame, use #10 ANSI wood screws that are 5/8” to 3/4” long in three of the four screw locations. One screw on each hinge should be at least 1 1/2” long to reach the stud. This screw is typically left out and is installed after the door is positioned in the rough opening. Install the frame leaf of the Set Hinge into the routing on the frame and fasten securely. Do not allow the Set Hinge(s) to support the weight of the panel without installing the Guide Hinges. Install the frame leaf of the Guide Hinges into the routings on the frame and fasten securely. Leaves on the Guide Hinges will slide freely up and down for alignment with the rout. Do not adjust hinges prior to the final installation into the rough opening. This will affect the ability of the door installer and end user to utilize the full adjustment range of the HOPPE Adjustable Hinge. Disassembly Do not attempt to remove the hinge pin, as this may cause damage. To disassemble the door panel from the frame, support the weight of the panel to relieve the weight from the hinges. Carefully remove either the frame leaf screws or door leaf screws to displace the panel. Adjustment Instructions Introduction There are two types of HOPPE Adjustable Hinges on each door panel: Set Hinge: One or two per panel. The Set Hinge provides ± 1/8” vertical adjustment. Guide Hinge: Two or three per panel. The Guide Hinges provide ± 1/8” horizontal adjustment. Look for the visible adjusting screw on the door sash leaf. This identifies the hinge as a Guide Hinge. Hinge designs may vary, but adjustment remains the same. Required Tools A 3/16” hex wrench is required. A small flat head screwdriver is required. A plastic putty knife is recommended. Vertical Adjustment for Doors with One Set Hinge With the door closed or open: Remove the press-fit Finial Cap from the bottom of the Set Hinge to expose the adjustment screw. Use the small screwdriver for Set Hinges featuring a plastic Finial Cap. A plastic putty knife is recommended for Set Hinges featuring a brass Finial Cap. Insert the hex wrench into the bottom of the Set Hinge. Tighten the screw to raise the panel and loosen to lower the panel. Reinstall the Finial Cap removed in Step 1. Vertical Adjustment for Doors with Two Set Hinges With the door closed or open: Remove the press-fit Finial Cap from the bottom of the Set Hinge to expose the adjustment screw. Use the small screwdriver for Set Hinges featuring a plastic Finial Cap. A plastic putty knife is recommended for Set Hinges featuring a brass Finial Cap. To raise the panel, insert the hex wrench into the top-most Set Hinge and tighten the adjustment screw to achieve the desired Insert the hex wrench into the other Set Hinge and tighten the adjustment screw 1/8 turn past the onset of resistance to distribute the panel weight evenly between both Set Hinges. To lower the panel, insert the hex wrench into the top-most Set Hinge and loosen the adjustment screw as far as possible without Insert the hex wrench into the other Set Hinge and loosen the adjustment screw to achieve the desired adjustment. Retighten the adjustment screw on the top-most 1/8 turn past the onset of resistance to distribute the panel weight evenly between both Set Hinges. Reinstall the Finial Caps removed in Step 1. Horizontal Adjustment With the door open: Insert a 3/16” hex wrench into the horizontal adjustment screw. Turn clockwise to decrease the margin and counterclockwise to increase the margin on the hinge side.
$ 120.00
-
S4015 - Truths Sentry Adjustable Door Hinge - Guide Hinges
Part Number: S4015 - Truths Sentry Adjustable Hinges - Guide Hinges If not in stock but a preorder item then it’s a Special order Item No Returns Screws Not Included Engineered for maximum strength and security, Sentry Hinges exceed ANSI grade 3 requirements fordoors weighing up to 220 lbs. Sentry Hinges exceed ANSI grade 1 impact specifications. Sentry Hinges aremade of extruded brass and extruded aluminum that provides superior strength and corrosion resistance.Sentry Hinges provided with non-removable pins for maximum security. Robust, Reliable and Attractive Industry standard 4" x 4" with 5/8" radius corner Both Guide (Part # S4015) and Set (Part # S4016) Hinges take a 5/32" hex wrench Guide Hinge (Part # S4015) has a 11/64" adjustment and Set Hinge (Part # S4016) has a 1/4" adjustment Extruded brass hinges are provided in decorative finishes including PVD Extruded aluminum hinges are available in powder coated painted finishes Composite bushings provide noise-free operation Set and Guide Hinge Placement: 3 Hinges Per Door Panel: Starting at top of door Top of door Guide Set Guide 4 Hinges Per Door Panel: Anytime you need 4 hinges you would just add another guide hinge Starting at top of door Top of door Guide Guide Set Guide The Set hinge no matter what is always the 2nd from the bottom Pro Tip: Remove weight from the hinges by lifting up on the door before you adjust.
$ 55.00 - $ 135.00
-
S4016 - Truths Sentry Adjustable Door Hinge - Set Hinges
Part Number: S4016 - Truths Sentry Adjustable Hinges - Set Hinges If not in stock but a pre order item then it’s a Special order Item No Returns Screws Not Included Engineered for maximum strength and security, Sentry Hinges exceed ANSI grade 3 requirements fordoors weighing up to 220 lbs. Sentry Hinges exceed ANSI grade 1 impact specifications. Sentry Hinges aremade of extruded brass and extruded aluminum that provides superior strength and corrosion resistance.Sentry Hinges provided with non-removable pins for maximum security. Robust, Reliable and Attractive Industry standard 4" x 4" with 5/8" radius corner Both Guide (Part # S4015) and Set (Part # S4016) Hinges take a 5/32" hex wrench Guide Hinge (Part # S4015) has a 11/64" adjustment and Set Hinge (Part # S4016) has a 1/4" adjustment Extruded brass hinges are provided in decorative finishes including PVD Extruded aluminum hinges are available in powder coated painted finishes Composite bushings provide noise-free operation Set and Guide Hinge Placement: 3 Hinges Per Door Panel: Starting at top of door Top of door Guide Set Guide 4 Hinges Per Door Panel: Anytime you need 4 hinges you would just add another guide hinge Starting at top of door Top of door Guide Guide Set Guide The Set hinge no matter what is always the 2nd from the bottom Pro Tip: Remove weight from the hinges by lifting up on the door before you adjust.
$ 75.00 - $ 200.00
-
S4017 - Pivot True V200 Two Way Adjustable Door Hinge - Ashland
Part Number S4017 Pivot True V200 Two Way Adjustable Door Hinge - Ashland Colors In Stock: White and Oil Rubbed Bronze All other colors are not A STOCK ITEM ALLOW 3+ WEEKS LEAD TIME ONCE YOU PLACE YOUR ORDER - SPECIAL ORDER ITEM NO RETURNS HINGES ARE HANDED LEFT HAND AND RIGHT HAND - SEE PICTURE TO DETERMINE YOUR HANDING YOU NEED TO ORDER. Discontinued Colors: Gold Powder Painted is discontinued. Once our stock is depleted they will no longer be available to order. If you can add to cart it is still available Dimension Current Style: 4 inch wide x 4.25 inch tall Discontinued Size: Old style that has been discontinued was 3.75 inch wide x 4.25 Tall. The current style we sell is what Marvin recommends as the replacement option which does require some retro fitting see drop down menu of picture's for Marvin instructions on how to retro fit as well as differences between the old hinge and new hinge and further questions on how to retro fit this hinge you would need to contact Marvin directly). Screws NOT Included Factory Recommends Using the Following Screws Per Hinge: 1 − #10x2 1/2″Phillips flathead wood screws (jamb) 5 − #10x3/4″Phillips flathead wood screws (jamb, stationary stile) 4 − #8x1 1/2″Phillips flathead wood screws (panel) To Adjust Door use: 5/32″ Allen wrench. Key Features: All Hinges adjust both horizontally and vertically A Solid brass extruded jamb wing allows for higher hinge carry capacity Hex head adjustment screws, not Phillips or slotted, to provide secure toll engagement and prevent stripping during adjustment Stainless steel adjustment screws bromide superior corrosion resistance An integrated hinge pin to provide security for out-swing and in swing doors, and will not lift up during normal door operation Performance and Operation Horizontal adjusts 1/16” further than most hinges on the market. Hinge system adjusts 1/4” vertically and horizontally Extremely low adjustment force by vertically adjusting the door from below, not laterally like other hinge designs Provides and easy-to-see indicator line for accurate vertical adjustment A “maintenance and noise-free” operation, even after a million cycles, by incorporating an internal polymer bushing to eliminate any metal to metal contact Exceeds BHMA-Grade 3 standards for wood, vinyl, aluminum and steel doors How to Adjust Hinge: It is best to lift the weight of the door panel off of the hinges, then adjust the hinge. This can be done by having a 2nd person lift up on the inside and outside door handle, when the door panel is open. First make horizontal adjustment. To adjust away from jamb turn horizontal adjustment screw counterclockwise using 5/32" Allen wench. To Move panel toward jamb turn Allen screw clockwise. (Horizontal adjustment screw is located on the hinge leaf that has 2 screws on either side of it). Make any vertical adjustments only after you have completed any horizontal adjustments. To adjust the panels vertically, turn the vertical adjustment screw clockwise using a 5/32" Allen wench. To Lower the panel turn the Allen screw counter-clockwise. (Vertical adjustment screw is located on the bottom of the hinge in the hinge pin shaft) Known to have been used on: Marvin Ultimate In-swing Patio Doors (old style was used pre-2011 and current style was used starting July 30 2012 once they stock of old style ran out) Caradco Jeld-Wen Known Part Numbers: 02101216, 02101213, 02101218, 02101217, 02101210, 02101214, 02101212, 02101219, 02101211, 02101215, 02101220, 02101234, 02101236, 02101227, 02101224, 02101229, 02101228, 02101221, 02101225, 02101223, 02101230, 02101222, 02101226, 02101231, 02101235, 02101237
$ 50.00 - $ 154.00
-
S4301 Hinge Cap for HG100 and HG200 Amesbury Truth Dual Adjustable Door Hinge
Part Number: S4301 Sold Individually Hinge Cap replacement for HG100 and HG200 Amesbury Truth Dual Adjustable Door Hinge Part Numbers S4005 S4006 S4007 S4008 Color: Black Sold Individually Use on part number: S4005 S4006 S4007 S4008
$ 8.00