Part Number S3007
Mortise Lock with Faceplate 45 Degree Diagonal Hub with Keeper
Aluminum Finish
Associated Parts Sold Separately:
Part Number: S3006 - C Elite Center Latch Sash Controls
Part Number: 522 - C Elite Offset Latch Sash Controls
Known Part Numbers and Numbers Stamped on Product: Canada Patent Number 919213 Dated 1973
Known Brand used on: Traco
Part # S3009
Vanguard Mortise Lock Box Sliding Patio Door
Comes with mortise lock box and keeper (keeper comes in white color only)
If you would like to order the lock box with matching handle set please see Part # S3005
Known Brands: Fasco and Vanguard. PO# 31729, Pat.# US6672632, VA-3200115
Part Number: S3010
Free standard shipping on all orders - no minimum (USA only).
Amesbury Truth - Olympus Handles For Gliding Doors
Offset Latch Handle Set For Sliding And Gliding Patio Doors
This is handle set only (the internal mortise lock box is sold separately as many different ones are used with this handle set. It depends on what the door manufactured used on the door see associated products)
Non Keyed Style Comes In Colors: White, Black and Brushed Chrome (non keyed is where you can lock on unlock the door only from the inside)
Keyed Style Comes In Colors: White or Black - Includes keyed cylinder and 2 keys.
Dummy: Email for quote Info@WindowPartsCenter.com
Other Info:
Used on vinyl, composite, wood and aluminum doors
Compatible for style thickness from 1 1/4” - 2 1/4”
Known Manufacturers: Olympus, Jeld-Wen doors and doors with stamp JW on handle set, Ply Gem, American Craftsman, Atrium and many other door manufacture
Part Number: S3011
Sliding Patio Door Mortise Lock Box - Recessed Mount 597
Single-point sliding door lock is the work-horse in the industry, with proven reliability and strength. We incorporate a variety of trim-plate options, making our system compatible with all standard fabrication in the market today.
Product Highlights: Can withstand forced entry loads in excess of 1000 lbs. Hook bolt has anti-slam feature that will retract the bolt if the boor is extended Adjustable reach hook bolt is actuated by 90 degree rotation of the hub
Overall Dimension: 1" Wide X 5 1/4" High
Manufacture: Amesbury Truth
stamped on back of part is number 21472
Associated Parts Sold Separately:
Part Number: 522 C Elite Handle Set - Offset Latch
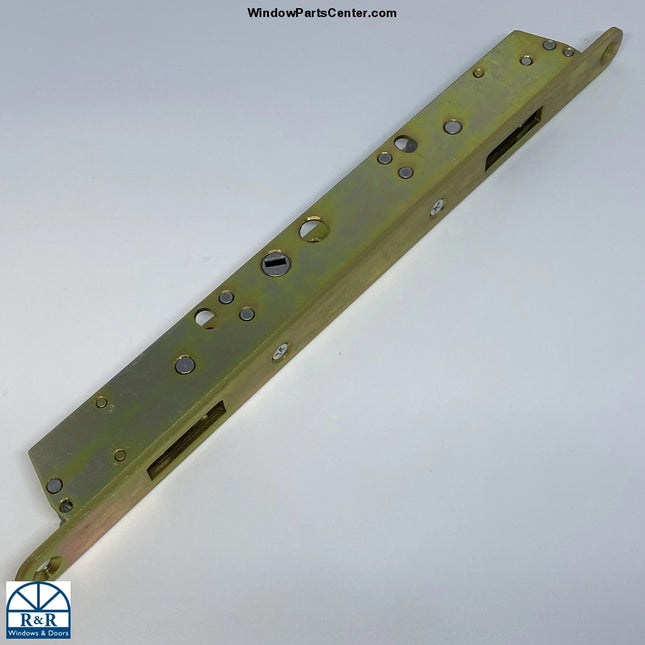
Part Number: S3012
Double Point Mortise Lock For Sliding Patio Doors
current style: direct replacement for old style. And has cylinders in both the top on bottom positions to to be used for multiple different handle set (see pictures)
Backset: 1 inch
Known to have been used on Atrium 332 Sliding Patio Doors and more door brands.
Known Associated Products Sold Separately:
Part Number: S3010 - Offset Latch Handle Set For Sliding Patio Doors
Part Number S3017 - Center Latch Handle Set for Sliding Patio Doors
Part Number: S3013
Tandem Roller Top Hole Mounting Sliding Patio Doors
Sold Individually
Finish: Steel or Stainless Steel
Non stock item: Please allow 2-4 weeks for your order to ship as these rollers get ordered from the factory one you place your order with us.
*Note to customer* there are a wide verity of tandem door rollers available. If the drawing does not look exactly like your tandem door roller Click Here to see all rollers on our website. If you cant find the part you are looking for please email or text us a picture of your roller and our research team would be happy to assist you with finding the right one. Email: Info@WindowPartsCenter.com Text Line: 303-222-4489
Part Number: S3014
Tandem Door Roller 1 1/8 Inch Wheels
Sold Individually
Finish: Stainless Steel
Non stock item: Please allow 2-4 weeks for your order to ship as these rollers get ordered from the factory one you place your order with us.
*Note to customer* there are a wide verity of tandem door rollers available. If the drawing does not look exactly like your tandem door roller Click Here to see all rollers on our website. If you cant find the part you are looking for please email or text us a picture of your roller and our research team would be happy to assist you with finding the right one. Email: Info@WindowPartsCenter.com Text Line: 303-222-4489
Part Number: S3015
Tandem Door Roller 1 1/4 Inch Wheels
Sold Individually
Wheel Type Material: Steel, Nylon or Stainless Steel
Non stock item: Please allow 2-4 weeks for your order to ship as these rollers get ordered from the factory one you place your order with us.
*Note to customer* there are a wide verity of tandem door rollers available. If the drawing does not look exactly like your tandem door roller Click Here to see all rollers on our website. If you cant find the part you are looking for please email or text us a picture of your roller and our research team would be happy to assist you with finding the right one. Email: Info@WindowPartsCenter.com Text Line: 303-222-4489
Part Number S3016
GEMINI 2 POINT KEEPER 2541 Series – Multi Point
Dual Hook Box Strike Keeper for Sliding Patio Door
Color: White
Known to have been used on Mercer Sliding Patio Doors and other door brands that used Amesbury Truth parts
Known Part Number: 2541, 2541-10XX, 2541-10SW, 12-354W
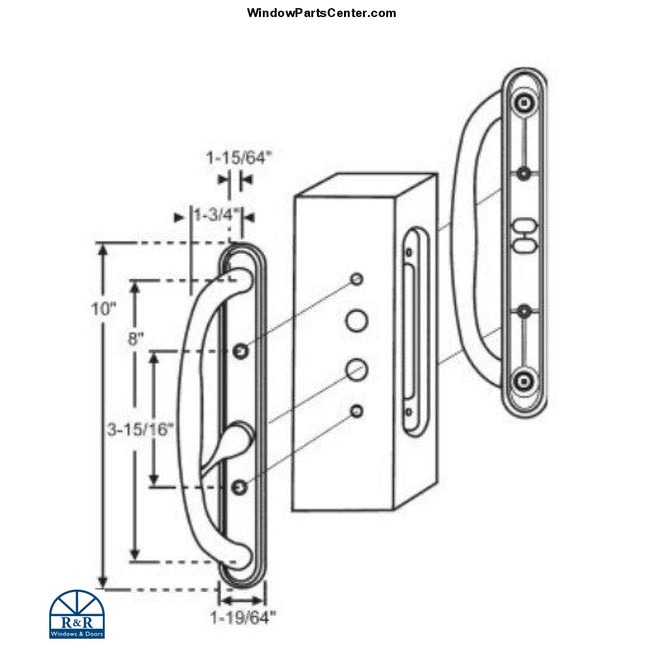
Part Number: S3017
Amesbury Truth - Olympus Gliding Door Handles
Center Latch Handle Set For Sliding Patio Doors- no keyed
handle set only. Mortise lock box sold separately.
Color: White, Black and Brushed Chrome
Overall Dimensions: 1 3/4” w x 10” h
center to center screw hole: 3 15/16”
Used on vinyl, composite, wood and aluminum doors
compatible for style thickness from 1 1/4” - 2 1/4”
Free standard shipping on all orders (USA only)
Known Associated Products Sold Separately:
Part Number: C1035 Dual Point Mortise Lock Box
Part Number S3012: Double Point Mortise Lock Box
Part Number S3019: Thumb Turn Replacement Kit With Full Tail
Part Number S3010: Olympus Offset Latch Handle Set
Part Number: S3018
Amesbury Truth Mortise Style Handle Set For Sliding Patio Doors
3 15/16 Inch Hole Centers
Can be used with single point or multi point mortise lock boxes (sold separately)
Non Handed can be used with Left Handed and Right Handed Doors
Non Keyed - Can lock and unlock door from interior side only
For Door thickness: 1-1/4" to 2-1/4"
Color: White
Part Number Stamped on exterior handle #1 3506. and Part Number Stamped on Interior Handle C 2806
Known to have been used on Mercer Doors and many other sliding patio door brands.
Associated Parts Sold Separately:
(NOTE: Different door manufactures use different mortise lock boxes and keepers with this handle set. If the keeper or lock you need to go with handle set S3018 for your door is not one of the listed below please email us pictures. )
Part Number: C1035 Amesbury Truth Gemini II PD Dual Action Mortise Lock
Part Number: S3016 - Dual Hook Strike Keeper for Sliding Patio Door
Part Number: C1059 Amesbury Truth PD GEMINI KEEPER 2-3 panel(DUAL MORTISE)
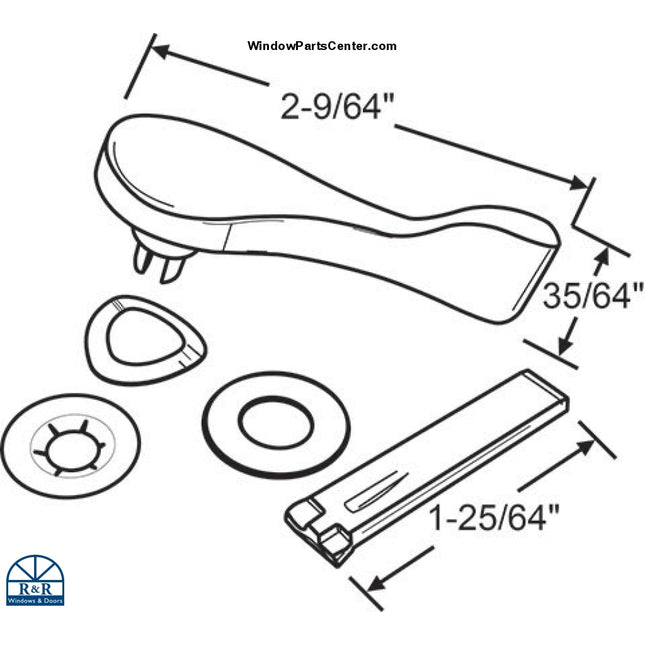
Part Number S3019
Patio Door Handle Thumb Turn Replacement Kit With Full Tail
Amesbury Truth
Available colors: White, Black, Bronze, Brushed Chrome, Antique Brass
Discontinued Color No Longer Available: Almond
Replacement part for handle set S3010 and S3017 other Amesbury Truth handle sets