Part Number: S3023
Patio Door Roller Assembly 1 1/4 inch Steel Wheel PDR 40 (C)
Featuring a 1 1/4 inch Steel Wheel PDR 40 (C), the S3023 Patio Door Roller Assembly offers a reliable and steadfast solution.
Material (housing): Stamped Steel or Stainless Steel
Wheel Size: 1-1/4 Inch
Wheel material: Steel
Number of wheels: 1
Sold Individually
Known to have been used on Peachtree Citation
Top panel guide rollers are recommended when replacing bottom panel rollers Part Number S3024
Part # 210 - Amesbury Truth 11 Series (11.14) Awning OperatorWhite and Bronze are special order items. No returns. 3-4 week lead time.
Known Part Numbers: 210 U.S. PAT. 4505601, PAT, CAN. 1986, 45301 Known Brands: For larger Hurd awning windows built prior to 1988., Weather Sheild, BiltBest, Truth, Amsbury Truth, 11 Series (11.14), 11-14-32-001
Steps in the below video are very similar when you are replacing part number 210 awning operators.
Part number: S1095
Color: Bronze
Length: 70 inches lengths (shipped straight can not roll)
Overall Dimensions: 3/8 Inch x 1/2 Inch
70 inches = 1 pc
Sample: If you order a Sample it will be approximately 2 inches long. If you selected sample you will receive a small cut pieces for color/fit reference only. No returns on samples
Peachtree ariel casement and awning sash weather stripping
Leaf weather stripping
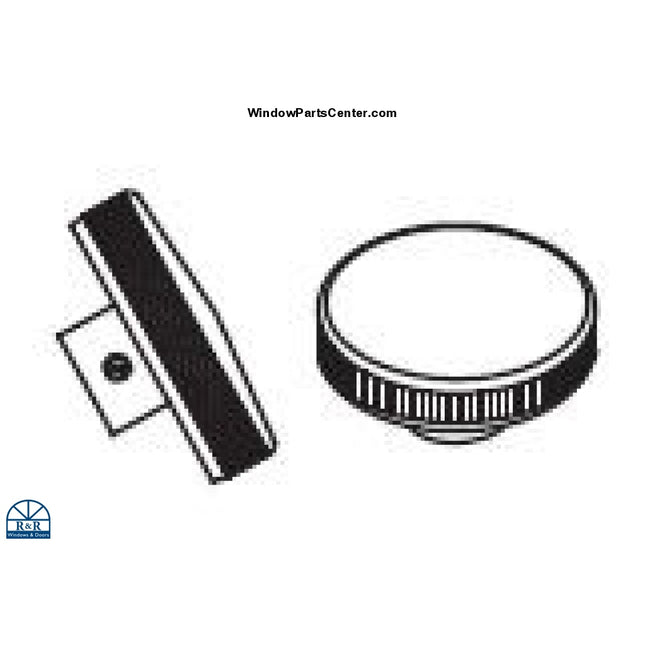
Part Number: S6008
Screen Door Roller PSR86
SOLD Individually
Brand: PeachTree
Wheel: Steel 1 Inch
*Note to customer* there are a wide variety of rollers available. If the drawing does not look exactly like your tandem roller Click Here to see all rollers on our website. If you cant find the part you are looking for please email or text us a picture of your roller and our research team would be happy to assist you with finding the right one.
Email: Info@WindowPartsCenter.com Text Line: 303-222-4489
Screw to install Roller is NOT included. You can purchase a #8 x 3/8" Stainless Steel Phillips Pan Head Screw at local hardware store. One per roller needed. FYI, it will create the thread as the screw is fastened.
Part Number: S4115
Peachtree W&F Peachtree Citadel Swing Patio Door Multipoint Lock Aux Module
This is designed to be field reversible. The latch is two
stage, it operates first as a latch, then further extends to
be a deadbolt. But the housing is symmetrical and the latch
is removable. It can be operated for Left hand or Right Hand, inswing or outswing swing doors.
Associated Parts Sold Separately:
D301 W&F Trilennium multipoint 6 Inch CTC Replacement Handle Set
S4112 - Peachtree Multipoint Mortise Lock Citadel IPD Citation W&F
Part Number: S1096
Peachtree Ariel Bottom Casement Hinge Assembly
Style: Left Hand or Right Hand (see picture to determine handing)
Size: Standard or Egress (see drawings with dimensions to determine your size)
Associated Accessories Sold Separately:
Part Number: S1097: Top Casement Hinge Assembly
Part Number: S1098 Peachtree Ariel Casement Window Sash Hinge Pivot Screw and Washer
Part Number 108
Casement / Awning Hand Knob
Fits Truth Operators 11/32" Spline OnlyColors: GoldTone, White, Bright Brass, Bronze, Clay, Aluminum, Chestnut Bronze, Beige, Coppertone
Bulk Discounted Applied in My Cart:
QTY 10-19 12%
QTY 20-39 19%**
QTY 40-79 25%**
QTY 80+ 29%**
**Orders of QTY 20 or more are considered specials order no returns.
Part Number: S4013
Hoppe Millennium Adjustable Hinge - 2-D Set Hinge with Non-removable Pin Vertical Adjustment - Hinges are Non Handed. Works for both Left hand and Right hand swinging doors. Known to been used on WeatherSheild and Peachtree Doors
Colors Still Available: Stainless Steel
Discontinued Colors: Oil Rubbed Bronze, Brass Chrome, antique brass
Pat.Nr. 5.701.1636, 122210600
Set and Guide Hinge Placement Table:
3 Hinges Per Door Panel - Up to 165 lbs:
Starting at top of door Top of door
Guide - Part Number S4014
Set - See Part Number S4013
Guide - Part Number S4014
4 Hinges Per Door Panel -Up to 165 lbs:
Anytime you need 4 hinges you would just add another guide hinge
Starting at top of door Top of door
Guide - Part Number S4014
Guide - Part Number S4014
Set - See Part Number S4013
Guide - Part Number S4014
4 Hinges Per Door Panel - 165 - 330 lbs:
Starting at top of door Top of door
Guide - Part Number S4014
Set - See Part Number S4013
Set - See Part Number S4013
Guide - Part Number S4014
5 Hinges Per Door Panel - 165 to 330 lbs:
Guide - Part Number S4014
Guide - Part Number S4014
Set - See Part Number S4013
Set - See Part Number S4013
Guide - Part Number S4014
Pro Tip: Remove weight from the hinges by lifting up on the door before you adjust.
Known part # 850-2388803, 850-8754819, 122210600
General HOPPE Adjustable Hinge Adjustment Instructions:
Determine hinge locations on the frame and door panel. Recommended hinge positions are given in the Set and Guide Hinge Placement Table above.
Prepare the door panel and frame.
Fasten hinges into the door panel. #10 ANSI wood screws with a minimum length of 1 1/4” are recommended. The Set Hinge must be installed according to the installation label. The label on the frame leaf will point down to the sill when properly installed.
On the frame, use #10 ANSI wood screws that are 5/8” to 3/4” long in three of the four screw locations. One screw on each hinge should be at least 1 1/2” long to reach the stud. This screw is typically left out and is installed after the door is positioned in the rough opening.
Install the frame leaf of the Set Hinge into the routing on the frame and fasten securely. Do not allow the Set Hinge(s) to support the weight of the panel without installing the Guide Hinges.
Install the frame leaf of the Guide Hinges into the routings on the frame and fasten securely. Leaves on the Guide Hinges will slide freely up and down for alignment with the rout.
Do not adjust hinges prior to the final installation into the rough opening. This will affect the ability of the door installer and end user to utilize the full adjustment range of the HOPPE Adjustable Hinge.
Disassembly
Do not attempt to remove the hinge pin, as this may cause damage.
To disassemble the door panel from the frame, support the weight of the panel to relieve the weight from the hinges.
Carefully remove either the frame leaf screws or door leaf screws to displace the panel.
Adjustment InstructionsIntroductionThere are two types of HOPPE Adjustable Hinges on each door panel:
Set Hinge: One or two per panel. The Set Hinge provides ± 1/8” vertical adjustment.
Guide Hinge: Two or three per panel. The Guide Hinges provide ± 1/8” horizontal adjustment. Look for the visible adjusting screw on the door sash leaf. This identifies the hinge as a Guide Hinge.
Hinge designs may vary, but adjustment remains the same.
Required Tools
A 3/16” hex wrench is required.
A small flat head screwdriver is required.
A plastic putty knife is recommended.
Vertical Adjustment for Doors with One Set HingeWith the door closed or open:
Remove the press-fit Finial Cap from the bottom of the Set Hinge to expose the adjustment screw. Use the small screwdriver for Set Hinges featuring a plastic Finial Cap. A plastic putty knife is recommended for Set Hinges featuring a brass Finial Cap.
Insert the hex wrench into the bottom of the Set Hinge. Tighten the screw to raise the panel and loosen to lower the panel.
Reinstall the Finial Cap removed in Step 1.
Vertical Adjustment for Doors with Two Set HingesWith the door closed or open:
Remove the press-fit Finial Cap from the bottom of the Set Hingeto expose the adjustment screw. Use the small screwdriver forSet Hinges featuring a plastic Finial Cap. A plastic putty knife isrecommended for Set Hinges featuring a brass Finial Cap.
To raise the panel, insert the hex wrench into the top-most SetHinge and tighten the adjustment screw to achieve the desiredInsert the hex wrench into the other Set Hinge andtighten the adjustment screw 1/8 turn past the onset of resistanceto distribute the panel weight evenly between both Set Hinges.
To lower the panel, insert the hex wrench into the top-most SetHinge and loosen the adjustment screw as far as possible withoutInsert the hex wrench into the other Set Hinge andloosen the adjustment screw to achieve the desired adjustment.Retighten the adjustment screw on the top-most 1/8 turn past theonset of resistance to distribute the panel weight evenly betweenboth Set Hinges.
Reinstall the Finial Caps removed in Step 1.
Horizontal AdjustmentWith the door open:
Insert a 3/16” hex wrench into the horizontal adjustment screw.
Turn clockwise to decrease the margin and counterclockwise toincrease the margin on the hinge side.
IF THIS HINGE DOES NOT LOOK EXACTLY LIKE YOUR ADJUSTABLE HINGE. CLICK HERE TO SEE ALL THE ADJUSTABLE HINGES WE HAVE ON OUR WEBSITE TO ORDER. IF YOU ARE NOT FINDING YOUR HINGE PLEASE EMAIL OR TEXT OUR RESEARCH DEPARTMENT AND WE WOULD BE HAPPY TO ASSIST YOU
Part Number: S1150
Color: Almond/Beige Color only as seen in picture.
Keeper Only - for double hung lock (the lock is sold separately - see below)
Known to have been used on: Crestline Double Hung Window (Model 303) Sash Lock KeeperKeeper is also used with the Peachtree & Crestline 200, 250 & 300 Series Vinyl Window units
Locks Sold Separately See Below for Locks that can be used with this keeper
Part Number: S1097
Peachtree Ariel Top Casement Hinge Assembly
Style: Left Hand or Right Hand (see picture to determine handing)
Size: Standard or Egress (see drawings with dimensions to determine your size)
Associated Accessories Sold Separately:
Part Number: S1096: Bottom Casement Hinge Assembly
Part Number: S1098 Peachtree Ariel Casement Window Sash Hinge Pivot Screw and Washer
Part Number: D300* - 1 handle set will install on 1 door panel. If you have 2 door panels (like a French door) you will need to order 2 handle sets.
W&F Trilennium 6 Inch CTC multipoint bore D300 is the new Replacement Handle Set - Non stock item special order - Estimate 1-2 weeks for your order to ship (unless otherwise noted on our website about extended lead times) - No order cancellations or returns
D300 is for doors with: 6 inch center to center 1 7/8" or 2 1/8" diameter bores and mounting screw hole placement 5 3/8" Center To Center.
Requires: 1 11/16" or 2 1/8" cross bore
Model: D300 Standard Set**
Screw Hole Placement: 5 3/8" Center To Center
Size: for Door Thickness 1 3/4" or 2 1/4"
Colors: Victorian Bronze, Bright Brass, Satin Nickel, Black
Handing: Universal - Non handed. Works for both LH and RH swing doors depending on which lever you use for the exterior and interior.
Style:
Active Standard 150 Degree- Has Thumb Turn, Keyed Cylinder and Lever is Operational*** For Single and French Active door panels. (Degree is how far the lever handle rotates for newer style multi point see pictures)
Dummy - No Thumb Turn, No Key Cylinder and Fixed Lever**** For Inactive panels in French doors - that is fixed or has independent astragal installed
Tumbturn for 3020 - Has Thumb Turn, No Key Cylinder and Fixed Lever**** For Inactive panels in French doors that has 3020 lock installed only***
Active Modified 180° Option (Add-On)
This option modifies the lever handle to rotate 180°, which is required for some older multi-point and double bore systems. (See product images for examples of lever rotation.)
How to order:This is an additional add-on and must be selected under “Accessory Items.”
If you order 1 handle set → add Qty 1 of the 180° modification
If you order 3 handle sets → add Qty 3 of the 180° modification
Each handle set that needs this modification requires its own quantity.
Handle Sets have been known to have been used on Bayer, Pella, Peachtree and other door brands.
Known W&F old handle set Pat No. 4,671,089 stamped on back of trim plate
Notes for other options for this style hardware on older doors:
D300 is manufactured for the current multipoint system and will work for you right out of the box - order Active Standard 150 Degree (see pictures).
If you have older style multipoint or backset lock and dead bolt with 6” center to center bore and screw hole placement is
5 3/8" Center To Center then Active Modified 180 Degree (see pictures)
If your door has a 6 inch center to center 2 1/8" standard double bore with back set latch and dead bolt and screw holes are also 6" center to center you need to order part number 852).
If you are not sure what type of system your door has, please send us pictures of your handle set with the door panel open so we can see the hardware that the handle set connects to inside the panel. Email pictures to: info@windowpartscenter.com
footnotes:
Non stock - Estimated 1-2 week for your order to ship - No order cancellations or returns
*Active Modified 180 Degree bushing or cartridge has no manufacturer warranty
Warranty claims are handled on a case by case basis by the manufacturer. Pictures need to be emailed to info@windowpartscenter.com to submit a warranty claim for factory to review.
This handle set also comes in other Models: See part numbers: D300, D301, D302, D304
Operational Lever: Can move up and down when door is unlocked
Fixed Lever: Inactive, and is intended for push/pull function.
Do NOT use a power driver tool to attach the handle set face plate retaining screws. Thread damage can result and is NOT considered a product defect.
Associated Parts Sold Separately:
S4112 - Peachtree Multipoint Mortise Lock Citadel IPD Citation
For Trilennium Multi Point - Email us for quote. Info@WindowPartsCenter.com